At Thanksgiving I finished up the final placemat for my charity sewing project for 2018. This paper pieced pumpkins block is a free pattern in my Craftsy shop, by the way. The block had been sitting around for quite a while, so I added some cute flying geese to round it out to placemat size and quilted it simply with straight lines.
Today I rolled up all my placemats (made from leftover blocks, improv panels, and binding scraps), tied them with candy canes, and dropped them off at my local branch of Meals on Wheels to be given to home bound seniors with a holiday meal. I hope they make the recipients feel special. I didn't meet my personal goal as far as the number I hoped to make, but there's always next year, right?
Showing posts with label Christmas. Show all posts
Wednesday, December 19, 2018
Friday, December 4, 2015
Candy Coated Christmas Quilt
I've wanted to make a Christmas quilt for several years now but could never settle on a design that I liked, would have the patience to piece, and would look good in my house. I wanted something subtle but festive, simple but not monotonous to make. I discovered the perfect pattern in Sunday Morning Quilts by Amanda Jean Nyberg and Cheryl Arkison. The pattern, called Candy Coated, is an improv stripset design that is easy, quick, and perfect for using scrap strips. I made the quilt slightly wider and shorter than the pattern in order to make it a generous throw sized quilt.
The limited palette to cream, grey, and red gives the quilt a candy cane effect that isn't overly sweet.
I backed the quilt a soft flannel from Robert Kaufman and bound it with a scalloped stripe.
I used a simple loopy quilting design. It was a good choice because the quilt is very heavy because of the flannel. That, together with the large size, made it challenging to get through my tiny machine.
I love my new cozy, winter quilt. Now I'm all set for the holidays.
The limited palette to cream, grey, and red gives the quilt a candy cane effect that isn't overly sweet.
I backed the quilt a soft flannel from Robert Kaufman and bound it with a scalloped stripe.
I love my new cozy, winter quilt. Now I'm all set for the holidays.
Wednesday, December 3, 2014
Snowflakes
It's snowing! At least it's snowing in my living room with these adorable snowflake pillows. I'm feeling pretty good about checking a few handmade gifts off my list.
I made these pillows using a paper pieced pattern by Amy of During Quiet Time. I downloaded the pattern from her Craftsy store. The pattern includes the block in three sizes (6, 9, and 12 inches). The small pillow above uses the nine inch size. I finished the pillow with a self lining envelope back, using a tutorial by AmandaJean and some cute polka dot binding. The fabric on the back is Laurie Wisbrun's Brrr! from a couple of years back.
The lumbar pillow (16 x 26) uses three of the six inch blocks. I decided to quilt it with white thread, and I like how the thread blends into the snowflakes but stands out on the red fabric (Kona Rich Red), creating a pinstripe effect.
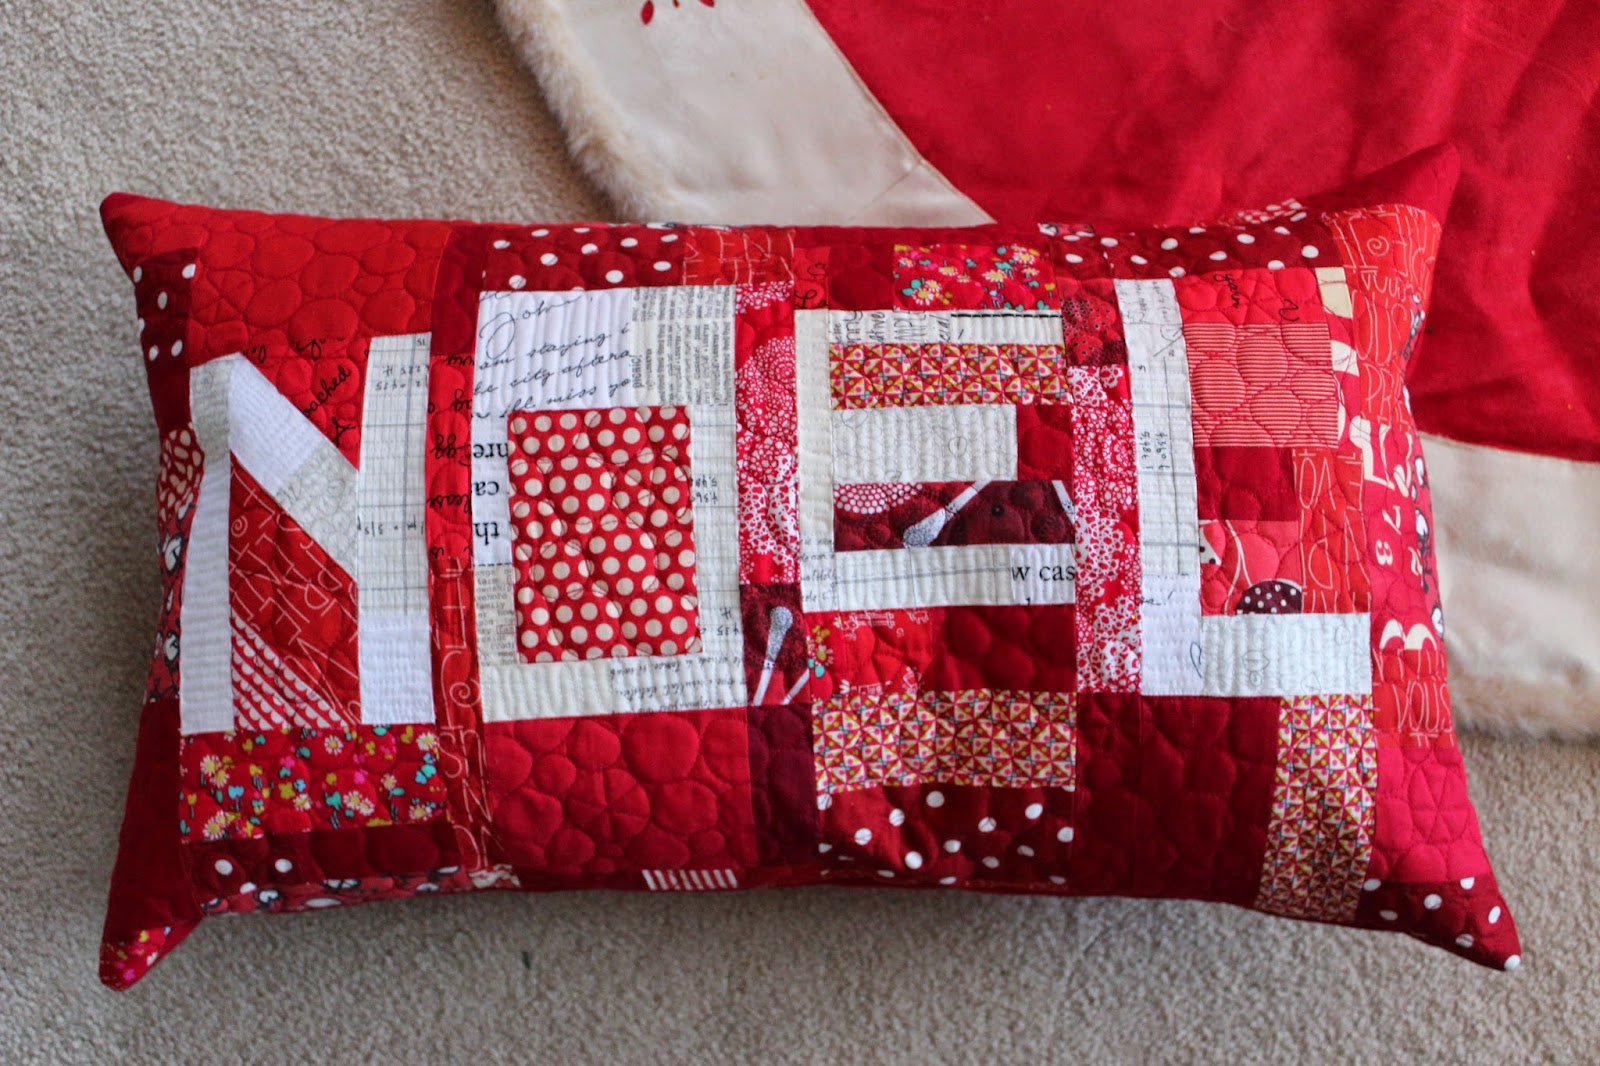
With two gifts finished, I decided to make a Christmas pillow for us to keep. I went a little crazy with my scraps and made improv letters and a strata background. It's wonky in a festive way, don't you think?
I got to play around with a new free motion quilting design I learned in a Craftsy class I'm taking by Christina Cameli. The pebbling is a fun contrast to the hard lines of the piecing, and I love the little touch the asterisk pebbles add. I'll be back soon with a full review of the class!
I made these pillows using a paper pieced pattern by Amy of During Quiet Time. I downloaded the pattern from her Craftsy store. The pattern includes the block in three sizes (6, 9, and 12 inches). The small pillow above uses the nine inch size. I finished the pillow with a self lining envelope back, using a tutorial by AmandaJean and some cute polka dot binding. The fabric on the back is Laurie Wisbrun's Brrr! from a couple of years back.
The lumbar pillow (16 x 26) uses three of the six inch blocks. I decided to quilt it with white thread, and I like how the thread blends into the snowflakes but stands out on the red fabric (Kona Rich Red), creating a pinstripe effect.
Monday, December 17, 2012
Last Minute Handmade
I finished up some handmade Christmas gifts just in time to mail them away. I always have requests for homemade cards. I used fusible web to adhere tiny scraps to a piece of colored card stock to make these bunting birthday cards. I sewed a line across the tops of the triangles and used adhesive squares to affix the card stock to the folded card.
I used my trusty micron pen and borrowed my son's water colors to make some simple thank you cards.
I realized after making this card that I had created a water color version of Carla's quilt! I love it so much, but it took a lo-ong time to make - too long for a set of note cards. I think I know a way to recreate it in a more automated fashion - a job for the new year.
But for now, I love giving handmade for Christmas with one last frame purse for my best friend. The outer fabric is my favorite Liberty Bloomsbury print, and I lined it with an Anna Maria Horner voile. Isn't that a gorgeous color! I stuffed it with a few goodies for her too.
I realized after making this card that I had created a water color version of Carla's quilt! I love it so much, but it took a lo-ong time to make - too long for a set of note cards. I think I know a way to recreate it in a more automated fashion - a job for the new year.
Labels:
AMH,
cards,
Christmas,
frame purse,
gift,
handmade Christmas
Monday, December 10, 2012
Modern Table Runner
I have to agree with Jacquie: I never get tired of improvised log cabin blocks. They are the perfect arena for play. I used some lovely scraps of hand screen printed fabric from Blueberry Park to make some fun, minimal, improv log cabins. My favorites are the ones that are missing a log or two.
I surrounded the log cabins with Essex Linen on my new design wall. If you do any improv piecing, this makes such a difference. I don't know how I've gone without one for so long!
The quilting is a simple serpentine stitch on my Bernina. For most machines I hear it is stitch #4. I usually mess around with the stitch length and width to get it just right. I love this stitch because it creates a nice texture with the ease of straight line quilting.
This extra block became a pot holder. Bonus.
I just need to tie these up in a bow and deliver them to a special friend who has encouraged me to think BIG this year.
I surrounded the log cabins with Essex Linen on my new design wall. If you do any improv piecing, this makes such a difference. I don't know how I've gone without one for so long!
The quilting is a simple serpentine stitch on my Bernina. For most machines I hear it is stitch #4. I usually mess around with the stitch length and width to get it just right. I love this stitch because it creates a nice texture with the ease of straight line quilting.
This extra block became a pot holder. Bonus.
I just need to tie these up in a bow and deliver them to a special friend who has encouraged me to think BIG this year.
Friday, September 14, 2012
Advent Calendar Class
I'll be teaching the Advent Activity Calendar pattern by Empty Bobbin Sewing at Bon Bon Atelier in Westport, October 13 and 27. If you haven't been to this cute boutique, you have been missing out on a unique, local shop. They have great fabrics, as well as gift items and yarn. We'll be meeting in their classroom space. And it is the perfect time of year for this project - you will be able to get it done in time to hang it up December 1st. Sign up for the class online here.
I'll be sewing along with you. I'm making a calendar for my sweet nephew whose mommy requested traditional Christmas colors. It's going to be a lot of fun!
Saturday, May 5, 2012
Calendar Pattern Winner
Thanks for all your comments. The randomly selected winner of Empty Bobbin's Advent Activity Calendar pattern is Pamela, and it sounds like she's going to get a lot of use out it! I've sent you an email, and I'll mail it off to you once I get your info.
Thursday, May 3, 2012
Advent Activity Calendar - Giveaway
Okay, it's giveaway time. Shea kindly gave me an extra pattern for her Advent Activity Calendar to give away to one of you. Leave a comment telling me who you would make this calendar for, and I'll pick a random winner Saturday morning. Be sure I have a way to contact you, or I'll choose another winner. Giveaway now closed.
Look, my calendar made the back of the pattern. It's on it's way now to hang in a booth at Quilt Market too.
Wednesday, April 18, 2012
Christmas Came Early
I finished my first bit of Christmas sewing for the year. Actually, I would have done it in late November like everyone else if it hadn't been for Shea. She asked me to test one of her latest patterns - the Advent Activity Calendar. I've been meaning to make an advent calendar for my boys, and I love that this one doesn't involve candy first thing in the morning.
I'm really excited to try all the fun activity cards that come with the pattern. Each preprinted card slips into a stocking. My kids are going to love doing a special Christmas activity each day.
I wanted to make something a little different and took the opportunity to use some fun, new fabrics. They are not my usual colors, which is a nice change, and the calendar will look great with my Christmas decorations. Isn't the photography pretty, too? All Shea's patterns are shot by Sarah Sorell.
If you have already tried an Empty Bobbin pattern you know the instructions are super clear and easy to follow with clever construction details. I loved how the stockings are cut from pre-pieced strip sets and you can add embellishments to your taste. I used invisible thread to applique my stockings in place, which worked really well. The good news for you is that Shea is giving me an extra pattern to give away, so check back for a shot at an early Christmas gift in a couple of weeks.
I'm really excited to try all the fun activity cards that come with the pattern. Each preprinted card slips into a stocking. My kids are going to love doing a special Christmas activity each day.
I wanted to make something a little different and took the opportunity to use some fun, new fabrics. They are not my usual colors, which is a nice change, and the calendar will look great with my Christmas decorations. Isn't the photography pretty, too? All Shea's patterns are shot by Sarah Sorell.
If you have already tried an Empty Bobbin pattern you know the instructions are super clear and easy to follow with clever construction details. I loved how the stockings are cut from pre-pieced strip sets and you can add embellishments to your taste. I used invisible thread to applique my stockings in place, which worked really well. The good news for you is that Shea is giving me an extra pattern to give away, so check back for a shot at an early Christmas gift in a couple of weeks.
Tuesday, January 31, 2012
Brrr! Quilt and Pillow
I knew I wanted to pair the Brrr! Laurie Wisbrun and Robert Kaufman sent me, with some Kona solids. I pulled Kona red, jade green, aqua, medium grey, and white, as well as some prints from my stash. I edited this stack as I started piecing. I found that the darker gray and blacks were overpowering the others, so out they went. Prints with a lot of white were great coordinates, and I love a good stripe and dot.
I wanted to keep the quilt really simple to feature the large polar bear dots fabric. You can cut one bear dot from a 3 1/2 inch square or four dots from a 6 1/2 inch square. I made a classic patchwork throw with 6 inch squares (finished). I think fabric choice is what makes or breaks this style of quilt, and I mostly happy with my choices.
The quilt is 54 x 66 which is a great size for a couch quilt. I backed it with Ruby gray scallop in flannel. This is super snugly!
And this pillow is actually the first idea that came to my mind when I saw the fabrics.
I don't know why, but I just thought the bears wanted to take a rocket ship to the moon. Hopefully Laurie will appreciate the whimsy of this piece as much as my boys do. I added some hand stitched details to the ship with pieces of selvage for fun. The moon rocks are machine quilted with a pebble design and I added some stars in the sky.
I used the freezer paper applique method and stitched it down with my machine. The little portals/windows were done the same way but reverse applique.
The back of the pillow is just as cute with larger pieces of my two favorite prints.
Come back tomorrow for one last little Brrr! project and a giveaway!
I wanted to keep the quilt really simple to feature the large polar bear dots fabric. You can cut one bear dot from a 3 1/2 inch square or four dots from a 6 1/2 inch square. I made a classic patchwork throw with 6 inch squares (finished). I think fabric choice is what makes or breaks this style of quilt, and I mostly happy with my choices.
The quilt is 54 x 66 which is a great size for a couch quilt. I backed it with Ruby gray scallop in flannel. This is super snugly!
And this pillow is actually the first idea that came to my mind when I saw the fabrics.
I don't know why, but I just thought the bears wanted to take a rocket ship to the moon. Hopefully Laurie will appreciate the whimsy of this piece as much as my boys do. I added some hand stitched details to the ship with pieces of selvage for fun. The moon rocks are machine quilted with a pebble design and I added some stars in the sky.
I used the freezer paper applique method and stitched it down with my machine. The little portals/windows were done the same way but reverse applique.
The back of the pillow is just as cute with larger pieces of my two favorite prints.
Come back tomorrow for one last little Brrr! project and a giveaway!
Tuesday, December 20, 2011
Dumplings
Just a few last minute gifts.
These little zipper pouches, called dumplings, are made from a free tutorial from Keyka Lou, and as always, her instructions are easy to follow with great step by step photos. I love how they are finished inside - no exposed seams or raw edges. I've made several more since, and they have already been gifted to friends.
Good luck with your last minute sewing!
These little zipper pouches, called dumplings, are made from a free tutorial from Keyka Lou, and as always, her instructions are easy to follow with great step by step photos. I love how they are finished inside - no exposed seams or raw edges. I've made several more since, and they have already been gifted to friends.
Good luck with your last minute sewing!
Saturday, December 17, 2011
New and Improved Ruffled Wristlets
I made my first ruffled wristlets and tutorial over a year ago, and they have been handy gifts for family, teachers, etc. I made several more this Christmas, and I came up with some improvements to the pattern. For starters, I'm hosting the new tutorial on google documents, which may be easier for some to access than scribd. It's certainly easier for me to upload that way. You can find it here:
New Ruffled Wristlets Tutorial
The new construction technique is what I'm most excited to share with you. I've finished the circle of the wristlet completely, so there are no raw edges. I've also created the ruffle from a single strip of fabric, rather than two as in the old tute. Finally, I made the loop larger. It is easy to slide on and off, even for those with larger hands. You can even adjust the size of the loop slightly in one of the final steps.
I hope you like it and find it improved and easy to download. I'd love to see any wristlets you make!
New Ruffled Wristlets Tutorial
The new construction technique is what I'm most excited to share with you. I've finished the circle of the wristlet completely, so there are no raw edges. I've also created the ruffle from a single strip of fabric, rather than two as in the old tute. Finally, I made the loop larger. It is easy to slide on and off, even for those with larger hands. You can even adjust the size of the loop slightly in one of the final steps.
I hope you like it and find it improved and easy to download. I'd love to see any wristlets you make!
Thursday, December 30, 2010
New Fabrics
Christmas and birthday money didn't last long in my hot little hands. I found these lovelies at an online store I've mentioned before. Does anyone else have trouble envisioning scale when shopping online? Some prints turned out to be larger and some smaller than I had imagined. Other than that I'm thoroughly pleased.
Here we have Zen Garden from Sanctuary and Dreaming in French, Praline in Fruity

I'm collecting fabrics from a gray and yellow quilt. From left to right these are Wave from Impressions by Ty Pennington, Spider mum from Day and Night 3, and Zen Garden from Sanctuary.
This is another Spider mum from Day and Night 3. I can't pass up brown, blue and white.
The top two here are Glass Tiles from Sanctuary and the bottom one is from Amy Butler's new line Soul Blossoms, called Dancing Paisley.
And finally, I swapped with a very nice lady on flickr for these amazing Indian fabrics (yes, as in India, taking a month to arrive by mail). The top two are hand block printed and have a really interesting nubby texture. The bottom is like a voile. Gorgeous!
Here we have Zen Garden from Sanctuary and Dreaming in French, Praline in Fruity

I'm collecting fabrics from a gray and yellow quilt. From left to right these are Wave from Impressions by Ty Pennington, Spider mum from Day and Night 3, and Zen Garden from Sanctuary.

This is another Spider mum from Day and Night 3. I can't pass up brown, blue and white.

The top two here are Glass Tiles from Sanctuary and the bottom one is from Amy Butler's new line Soul Blossoms, called Dancing Paisley.

And finally, I swapped with a very nice lady on flickr for these amazing Indian fabrics (yes, as in India, taking a month to arrive by mail). The top two are hand block printed and have a really interesting nubby texture. The bottom is like a voile. Gorgeous!
Subscribe to:
Posts (Atom)