Showing posts with label log cabin. Show all posts

Monday, October 12, 2020

Three Quarter Log Cabin Scrap Quilt


It is a relief to finish this quilt. Making the improv blocks from scraps was so relaxing last fall, but they sat another year on a shelf as I tried to figure out how to use them all together. The solution of sashing to separate the crazy prints and colors has worked fairly well.

The quilt is big by my standards (73 x 95), since I quilted it on my tiny home machine. I find small scale free motion designs well suited for a large quilt because the small shapes, like these loops, allow you to stop and adjust the quilt frequently without interrupting or marring a larger, flowing design. 


I used an extra wide yellow backing from my stash and an old Erin McMorris Summersault print that I love for the binding. I think largescale prints are so interesting as binding because you get quite a variation along the edge or the quilt.

Patting myself on the back for using these blocks rather than letting them languish, and I hope the quilt will be useful and a blessing to a local child in foster care. 

Saturday, August 15, 2020

Breathing Room

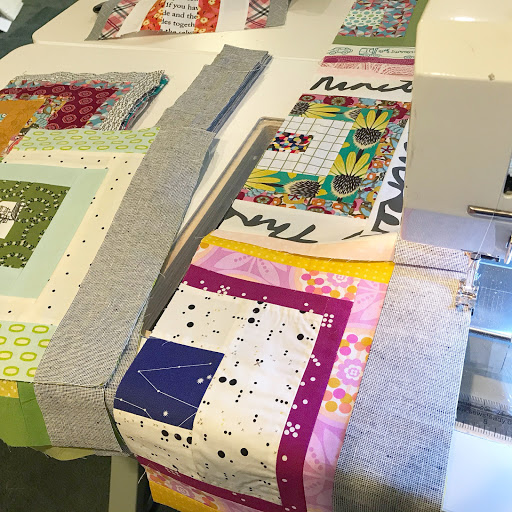
Remember this scrap project from last fall? I made three quarter log cabin blocks with my print scraps, using every shade and pattern. It was fun and therapeutic, but once I completed the blocks, I was dismayed to find I hated how they looked together. I even wrote a post contemplating where I went wrong. After leaving them on the shelf and the mental break of working on other projects, I decided to see if I could rescue the blocks. I do not ordinarily use sashing, but I knew the blocks needed some breathing room.

The fabric I chose for the sashing is Homespun Essex in indigo (although it reads as grey to me), and I think it is just what the blocks needed. The neutral space between the crazy prints tones down the chaos just enough. I picked my favorite 45 blocks, which finish about 9 x 12, so this will be an extra long twin when I get it pieced.


Wednesday, September 18, 2019

Scrappy Log Cabin Blocks

I saw Jacey's blocks on instagram and got an itch to sew with my scraps. My scrap bin of random width strips has been over flowing for a while now, so this project will be good for scrap management.
The blocks (maybe called 3/4 log cabin blocks since they are just missing one side) are sewn improvisationally and trimmed to 9  x 12.
I've got 15 so far. I think I have enough scraps strips to sew a few more, don't you think? The pile wouldn't even fit in the frame, and it doesn't seem to have diminished in the slightest. The magical procreation of scraps.

Thursday, October 12, 2017

Quarter Log Cabin Pillow

This project started with some leftover strips from a couple of projects that were sitting on the side of my cutting table looking like they belonged together. I use the strips to make a couple of improv quarter log cabin blocks, and I liked them. I made a couple more. Together these four blocks, deliberately mismatched, create a wonky, disjointed whole. It was a casual, unintentional project that just sort of happened. Sometimes those are my favorite kind.
I made the blocks into a pillow with some straight line quilting, a mustard back with zip closer, and a flanged binding.
The plum and mustard fabrics feel like fall to me. The pillow finishes at 20" square.

Monday, August 24, 2015

Castle Peeps Quilt

My dear friend Lauren humors my love of scraps by sharing hers with me periodically. That's a good friend, right?! In this last batch, she included several WIPS/UFOS (works in progress/unfinished objects). I couldn't resist the blocks she shared using Lizzy House's adorable Castle Peeps line. It's such a quirky, whimsical set of prints. The colors and fabrics are very Lauren, and the quilt also makes me think of forests and Robin Hood. Fun!
I finished up the improv log cabin blocks by making a few of my own to add to the mix (12 x 12, 6 x 12, and 6 x 6 blocks), piecing, and quilting the 36 x 48 baby quilt. I'm donating it to Project Linus and linking up to 100 Quilts for Kids.
I definitely recommend pairing up with a friend to swap WIPS and finish them, especially for a quick finish for a charity project. 100 Quilts for Kids runs through September 30th, so you still have time to finish up an old project, or a friend's project, and give a handmade gift to child in need. Remember, you can donate the quilt to any organization in your area that you like. Just link up for a chance to win prizes and see other quilters' contributions. I hope you'll join in!

Friday, December 5, 2014

Gameday Throw and a Book Signing

Here is a second project from Improvising Tradition which uses both the strips and slice and insert technique.  I call it Gameday Throw because the color blocked background and square log cabin blocks remind me of the field and players in a playbook diagram.  Can you tell I'm not very sporty?  In any case, the manly colors and wonky angles make this throw casual and perfect for snuggling on the couch watching the game.
photo by Joe Hancock
I will have this quilt with me, along with a few other projects from the book, at my first book signing tomorrow!  Please come out to see me at Modern Makers at 11am.  I find it easiest to take 12th street from downtown to the shop, which is at 1400 W 12th Street.  The shop is on the second floor of Le Fou Flea (look for the yellow sign). 
You will love this adorable shop.  Elizabeth has so many gorgeous fabrics and notions.  You can experience all the cute antique shops in the area, and since it is a first weekend, there will be yummy food trucks in the area too.  So come down, have some lunch, and make a fun afternoon of it!  I will have a few steps outs for anyone who is interested in seeing some techniques from the book explained.

Monday, November 24, 2014

By the Fireside, a project from Improvising Tradition

This quilted pillow is a project from my book, Improvising Tradition.  Log cabin blocks, made from strips, are a basic but incredibly versatile improv technique.  With this project, I not only show you how to create wonky log cabin blocks in two ways but also how to set them into a color blocked background with a fun slice and insert method.   
photo by Joe Hancock

With just a few variations, you can use this technique to create two more of my favorite projects from the book, which I will share soon.

Thursday, June 19, 2014

Sunshine Runner


I was lucky enough to have Lauren Hunt photograph my sunshine table runner.  All the photos in this post, in fact, were styled, shot and edited by Lauren.  I have decided not to feel badly about how sad my pictures look in comparison because she is a professional photographer; she has a degree in photography and years of experience (besides being an amazing artist, illustrator, quilter, pattern designer, fabric designer, and person in general).  
Most recently she was the photographer for School of Sewing, a Fall 2014 release written by Shea Henderson of Empty Bobbin Sewing, published by Lucky Spool.  The cover alone tells you it is going to be so, so good! 
 
Lauren also shoots covers for American Quilt Retailer. So, you can see how striking and lovely her work is.

Now, back to the runner.  It is a gift for my mother-in-law, who asked me to make something to use for spring and summer décor in her dining room. She requested that it include yellow.  I wanted to create something sunny and fairly traditional to suit her house.  I went with a common variation on the log cabin block.  Each block uses a different pair of yellow and gray prints. 
Using two different width strips, on opposite sides of the log cabin square, creates the illusion of a circular block.  My strips finished at 1/2 inch and 1 inch respectively.  Thin strips! Each block finishes at 11 inches square, making an 11 x 55 inch runner. (A pattern for a similar block in a larger size can be found in the spring issue of Quilt Sampler magazine. The pattern is by Holly deGroot of bijou lovely.)
I quilted the runner with swirls with light gray Aurifil thread to echo the circular design of the blocks.
Many thanks to Lauren for these gorgeous images. 

Saturday, May 17, 2014

Purple and Gray Strata Quilt

This quilt began as a pile of monochromatic strata.  I often sit down and create strata (improv, crazy pieced units) out of scraps when I need a bit of mindless sewing.  I added dark pink units around the lighter pink center rectangle, log cabin fashion.  The unit grew to include a final round of purple.
I decided to make a quilt, as the unit was too large for a pillow.  A large amount of negative space, using peppered shot cotton in charcoal, provided a nice space for some interesting quilting. I used matching aurifil thread and my walking foot to create a spiral from the center of the strata unit, outward.


I absolutely love the hand of the peppered shot cotton.  You can see a bit from the photos, how the warp and weft vary slightly from one another, since I cut the side and top borders the same way.  The warp and weft show slightly differently.  If this bothers you, pay attention to keeping the warp and weft oriented consistently in your border strips.

Shot cottons have a looser weave, in most cases, than quilting cottons, and in my experience can shift more when quilting.  As you may know, spiral quilting using a small home sewing machine requires a great deal of pushing and pulling through the machine throat and can result in a bit of distortion in a loosely woven fabric, especially if the quilt back is a quilting cotton which does not shift quite as much.

Even with some re-basting and unpicking, I ended up with some small tucks on the back of the quilt.  I have done spiral quilting on largish quilts, like the Tiny Log Cabin quilt, with no problem, so I surmise it the shot cotton made the difference.  I think straight-line in a single direction or free motion quilting would have gone over much better, but the manipulation required by spiral quilting a large quilt (60 x70) was not the best choice for the peppered shot cotton fabric.

Lesson learned, and hopefully someone will benefit from my experience.  The upside is that I get to keep this quilt!  I hope to use is as a sample for future classes on monochromatic strata piecing.

I'm linking to the Blogger's Quilt Festival for the first time.  Check out the link for so much inspiration.

Thursday, October 24, 2013

Tiny Log Cabin Quilt

Making this quilt was all about being in my happy place: scraps, improv, negative space, asymmetry.  The process took quite a bit of time.  There was lots of arranging and rearranging on the design wall, lots of trimming and adding strips here and there, and some time with the seam ripper.  Even the negative space is pieced improvisationally, using scraps.  This kind of process is relaxing to me, almost meditative. I made this quilt for myself, exactly the way it pleased me, and I love how it came out.
The quilting is a simple spiral using a walking foot, and I love the depth it adds to the quilt.  I placed the center of the spiral in the midst of the cluster of log cabin blocks.  It radiates outward, throwing out blocks along its path.
 
 
I picked a light blue and white DS Quilts print for the binding to keep the attention on the center of the quilt.

I was so happy to have a beautiful, sunny autumn day to take some pictures of this lovely quilt.  I'm looking forward to the day when my boys will be big enough to be quilt holders for me.  I'm prepping them now for photo shoots around town.  For now clips and trees play heavily.  It works.

Saturday, October 19, 2013

Tiny Log Cabin Blocks

I have another scrap project in the works.  Ever since I made my first tickertape quilt (pattern in Sunday Morning Quilts), I've saved even my tiniest scraps.  These bits are too small to be cut into 2 1/2" squares or two short to be thrown into my strips bins.  I have even been known to rescue scraps from my friends' trash piles at sewing meet ups.  It's a sickness, really.  But look how pretty they are!
Over the summer I started sewing these pieces into monochromatic, improv log cabin blocks.  I made a couple here and there while working on other things.  I've tagged them #tinylogcabinblocks on Instagram if you'd like to see more of a history of the project.  Each block is about 3" - 5" on a given side.  Some are rectangles, but most ended up more or less square.
The puzzle appeared as I put them on the design wall and thought of how to make them into a quilt.  I ended up improvising that part too.  I've used my neutral scraps to build the top.  It's great to use up all those random pieces of white and cream that don't seem to match any of your remaining yardage.
I'm quilting the top now.  Back soon.

Monday, August 12, 2013

Back to Bees

It's been a few years since I've participated in a virtual quilting bee.  I'm excited to join a couple of new bees with friends from my local KCMQG.  My first blocks are for Shea in the Crossing Borders Bee (at least I think that's name we settled on), who requested 6" x 6 " or 6" x 12" spool blocks and sent us some scraps to work with.  I was very happy to get to work with my favorite color.
I just had to make an Aurifil spool too.
The next block is a wonky log cabin in Quilt Con colors.  This is for the Blessing Bee which is a project for the guild as a whole, put together by the Community Service Committee.  Each month, members may make any number of 12" x 12" blocks they wish in one of three styles: wonky log cabin in these colors, wonky stars in pink and lime, or square in a square in orange and aqua.  Other members have signed up to assemble tops, make backing, quilt and bind.  I think this is such a great arrangement for a a bee, allowing everyone to help as they are able.  The types of blocks may change every few months, and of course, members are welcome to donate completed quilts they have made themselves.
Finished baby quilts will be donated to a local organization that gives birthday cakes and other things  to children who would otherwise not have a birthday celebration.  We are hoping to provide enough quilts for all the children turning 1, with hopes to expand if we are able. I'm looking forward to more bee blocks!