Showing posts with label hand sewing. Show all posts

Tuesday, August 4, 2020

Modern Appliqué Table Runner

My latest experiment with improv appliqué is perhaps the simplest of all - organic ovals not unlike stacked river stones. Each shape was cut by eye and appliquéd in place with matching thread. The fabrics are all shot cottons, and their shimmering colors are hard to capture in photographs. While not a strict gradient, the colors are arranged to shift harmoniously from one to the next. I think the design is at once bold and peaceful.


To add texture, I quilted the runner densely with organic straight lines in creamy Aurifil 50 weight thread. Keeping the focus on the appliqué, I bound the runner in the background fabric which makes it nearly disappear.

The runner finishes at 16 x 49, and this unique art piece is available in my etsy shop.

Monday, June 17, 2019

Appliqué Landscape

Another appliqué experiment - this time inspired by pottery.
I made up the process as I went along, and began with a quick freehand drawing using smooth, simple shapes. I numbered and labeled each piece before cutting the paper along the draw lines.
I used each paper piece as a template, cutting the fabric about 1/8" larger on all sides. I did this because I wanted about an 1/8" of foundation fabric to show between my appliqué shapes, reminiscent of the dark ceramic base of my inspiration. I experimented a bit with different colors in the landscape, ultimately keeping the hills a single green and swapping the lightest coral for one closer to the darker coral.

After pinning in place, making sure each piece overlapped evenly with its neighbors, I basted all the pieces down.
I used needle-turn appliqué and 50 or 80 weight, whichever I had on hand, of Aurifil thread to stitch the pieces down. This was a bit fiddly because of the overlapping pieces. Here it is about half finished.
After appliquéing, I removed the basting stitches. I like how the landscape looks, simply framed, but now I wonder if it would be improved with quilting. There is a slight wave to the fabrics that is bugging me a little bit, even with a few layers of batting added behind it. If I quilted it, I could mount it on top of the mat, rather than behind it. What do you think?

Tuesday, February 9, 2016

Twirligigs Quilt - Scraps, Inc. Volume 2 Blog Tour

If you've visited my blog more than a couple of times, then you know I *heart* sewing with scraps. It's my favorite way to make quilts. My quilt, Stripes Earned, from Scraps, Inc. Volume 1 featured scraps strips in a very masculine palette in keeping with the military inspiration. When I was asked to contribute to Volume 2, I took the opportunity to make a quilt with feminine curves and a saturated, analogous color palette.
The name Twirligigs came from the hanging, spinning garden ornaments that twirl in the breeze. I made the quilt using freehand arcs, sewn by hand using needle turn applique to strips of natural Essex linen. The improv shapes and offset placement of the curves in the columns creates the effect of spinning, cascading spirals. It's just a lot of fun. The bold, graphic shapes work best with saturated fabrics like I chose, but the quilt could take on an entirely different feel done in low volume prints on a dark background. The contrast is key.
Nydia Kehnle did the photography for Scraps, Inc. Volume 2. The urban setting she chose is such a fun contrast to the softness of the quilts. I often struggle with  photographing my quilts in interesting ways, and Nydia has done a beautiful job. The book has a fresh and hip feel, as do the scrap quilts in it. The book features 15 scrappy quilt patterns, each by a different designer.
Lucky Spool has kindly offered a copy of Scraps, Inc. Volume 2 for me to giveaway. For a chance to win, leave a comment on how you like to photograph your quilts, or the type of photos you enjoy most. I will chose a winner at random on Thursday February 11th at noon. Giveaway now closed, but you can purchase a copy at 30% off the list price here until February 16th. Just use the code Scraps30 for the discount.
Check out more stops on the Scraps, Inc. Volume 2 blog tour for more chances to win! You'll get a sneak peek at all the quilts in the book.
 
Monday, February 8 Amy Smart, Diary of a Quilter Nydia Kehnle, Nydia Kehnle Design + Photography
Tuesday, February 9 Amy Friend, During Quiet Time Alexandra Ledgerwood, Teaginny Designs Wednesday, February 10 April Rosenthal, April Rosenthal - The {Studio} Blog Dorie Schwarz, Tumbling Blocks
Thursday, February 11 Erin Harris, House on Hill Road Janice Ryan, Better Off Thread
Friday, February 12 John Adams, Quilt Dad Kari Vojtechovsky, Craft Happy
Saturday, February 13 Katie Blakesley, Swim Bike Quilt Kati Spencer, From the Blue Chair
Sunday, February 14 Melissa Lunden, Lunden Designs Allison Harris, Cluck Cluck Sew Sherri McConnell, A Quilting Life  

Friday, August 22, 2014

English Paper Piecing Revisited

I last wrote about this (very long term) English paper piecing project three years ago.  I can't believe it's been that long since I worked on it, but that's what the blog record  says.  I'd forgotten how fun it is to fussy cut scraps for the shapes.  I played around with the various effects you can get from fussy cutting stripes, dots, and other motifs on your fabric. You can see lots of individual pictures of the stars in my instagram feed.
I am still using the paper shapes from Paperpieces and the Sewline glue pen.  Making the jewel stars is relatively quick (I mean, this is hand sewing after all). I can make one, start to finish, including the fussy cutting, while waiting through one gymnastics class (about 45 minutes).  It's nice to have a portable sewing project, especially with so many sports practices these days.
Now that I have about ten stars made, I'm working on joining them to the low volume background fabrics and sewing them onto the group I made a few years ago.  This step is slow going and a bit of a puzzle.
Hopefully it won't be another three years before I have more to show you on this project.

Tuesday, July 31, 2012

Rectangular Wonky Stars

This tiny block was an experiment with making a rectangular wonky star block.  Instead of beginning with squares, as in regular wonky stars, which are a super fun block to make, I began with itty bitty rectangles.  They work out just the same, except you have to be careful to which side of the rectangle you add the star points.  I put an adorable Japanese fabric fussy cut in the center of the rectangle.  The block finishes at 1 7/8 x 2 1/4 inches.
I set my miniature block into the front of a Perfect Zip Bag (pattern by Elizabeth Hartman) via reverse applique and added some hand stitched details.  The outside of the bag is black yarn dyed essex which has incredible texture and at the same time is super soft.  Thanks to Rachel for sending me some!  I hope I can find more somewhere soon.  Love this stuff.

 The lining of the bag is oval elements in a great dark purple and plum.

I enjoyed making my first block so much I made another.  This on is slightly bigger and pieced into the front of a cell phone case.  I think I prefer the reverse applique setting, but this one is sweet too.
 They make a cute pair; I think I'll keep them.

Friday, December 23, 2011

One for the Road

We're just about to head out for our holiday travels, and I want to take some hand work along.  Jeni's drawstring bag is perfect to hold my WIPs.
The body of the bag is a special Koseki print, paired with Circa 1934 dots and numbers inside, with Heath strings.
 I'm filling the bag with my English paper piecing project.  Maybe I'll make some progress over the break.
Have a safe holiday season, and merry Christmas!

Sunday, October 9, 2011

Slow Growth

My latest paper pieced project is growing - very slowly.  I'm trying to decide how much bigger it should be.  It may be a pillow, or perhaps a wall hanging.  Not sure yet.
I can report that the papers are fairly easy to remove, using the Sewline pen, if you are gentle.  I eased the fabric away from the papers before pulling the papers out.  So far, so good!

Friday, September 23, 2011

A Return to Paper Piecing

I thought I was done with English paper piecing for a long while after my hexagon pillow, but then I saw this gorgeous project by Marg.  I hadn't seen the jewel shapes before.  Aren't they great with the hexies and diamonds?
I've had a lot of fun digging through my scraps and fussing cutting each shape.  And did you notice there are no basting stitches?  Marg also shared this magical fabric glue pen.  No basting!  I love this notion.  You can find it online, but if you're local to KC, Bernina on Metcalf has it.  Best. tool. ever.
I found the templates I needed at paperpieces.  Through a mailing mishap, they were kind enough to give me some extras, which I am going to give away.  Want to start a paper piecing project of you own?  Let me know in the comments, and I'll pick a winner Monday morning. Giveaway now closed.

Sunday, March 20, 2011

Tooth Fairy Pillow

The tooth fairy is scheduled to make her first ever visit to my house this week, so some preparations have been made. I worried about the precious tooth getting lost amidst stuffed animals and pillows and blankets, so I asked the internet for help. I found this cute idea of a tooth fairy pillow over at Sew Mama Sew. Just tuck the tooth inside and hang from a bedpost or door knob. The fairy can then easily and quietly switch it out during the night for a dollar or two (how much does she leave for a tooth these days?).

Thursday, March 17, 2011

A Solid Finish

I finally finished my solid hexagon project. Yes, it is just pillow sized (20" square), and it still seemed to take quite a while. Hats off to those of you who are persevering through much larger hexie projects.I'm glad I decided to hand quilt it. I love how the embroidery floss highlights each hexagon. I finished the pillow with a quilt style binding in Kona coal.

The inspiration for this pillow was a lovely letter press card I saw on etsy by krankpress. It's funny how a quilt inspired card can become a card inspired quilt.

Thursday, March 10, 2011

All by Hand

After making the hexagons by hand and hand sewing them together, I decided to finish my project with hand quilting. Why not. Up until a year or two ago, I quilted all my quilts by hand. As I was drawn more and more to modern quilting, I was attracted to the options created quilting by machine. And all this made me wonder, is machine quilting more modern than hand quilting?Certainly machine quilting can be used to complete traditional quilts and to make very traditional motifs (think old fashioned feathers, etc.), but it is also used in fun, innovative ways in many modern quilts. I've even seen some really cool combinations in modern quilts of machine and hand quilting used together.So, can a completely hand quilted quilt be modern? Is it the shapes used, rather than the method of stitching that makes quilting old fashioned vs modern, or something else? I've tried to make my hand quilting more modern by using embroidery floss and larger stitches to emphasize the quilting. Hey, I took time to hand quilt this, so I want you to notice. Other modern quilters use a variety of colors of floss or outlining to do the same thing.

So what do you think. Is hand quilting more retro cool or traditional?

Sunday, February 20, 2011

Mod Hex

How is it that the right mix of solids can make a traditional block look so modern? The magic of solids meets hexagons.
These are Kona solids in lagoon, cactus, ash, white, azure, and coal.

Saturday, March 13, 2010

Hexagon Pillow


My first finished hex project! I loved the hand sewing on this. It's really not as hard as it looks either. There are lots of good tutorials. I used this one. The author even links you to a cool tool that allows you to download and print hex templates in a variety of sizes!
I paired my hexes with a nice linen-look cotton in a neutral color. I interfaced my front to protect the hex seams and prevent any distortion. The back is a simple envelope closure. The pillow is 12x16, and it available in my etsy shop. I really want to keep this one, but these super gorgeous colors and fabrics don't match any of my decor :(.

Monday, February 22, 2010

Scrappy Hand Sewing Projects

First, let me say a big thanks to each of you who commented on the previous post about my son's quilt. I got lots of great suggestions for names. While I'm deciding on the backing and binding for it, I seem to have caught the hand sewing bug. I'm not sure how it happened except that there are so many great pictures on flickr and other blogs of hexes and cathedral windows.
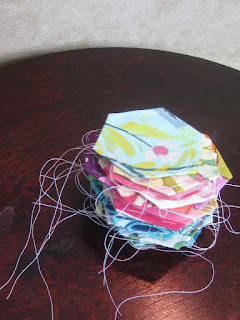
Besides being beautiful, they also appeal to my propensity for using scraps. I've got the bug so badly, I've even been buying scraps. It's a little embarrassing to admit, but I have fabric envy - all those goreous bits of Anna Maria Horner, Amy Butler, Heather Ross prints I see in the inspiration pics. Sigh. Anyway, I'm having lots of fun snuggling on the couch with these tiny beauties each night.

Thinking of trying a cathedral window yourself? Two words: spray starch. It made a world of difference in getting those folds to stay down and corners sharp.